Friday, November 18, 2011

Latest pictures of the panel alignement


photo 21


photo 22


photo 23


photo 12


Holy Crap!

Ive never owned a 455 car before, never driven one. And this one has not run well since I got it (total of about 10 miles since June!)

I bolted the latest carb on. Bent up a rod for my choke so it doesn't quite close all the way but opened 90°

The car started with just a couple pumps which is good considering there was no fuel in the carb

It idled so nicely with just a 1/2 turn of the idle/throttle screw.
I did not adjust the mixture screws.

I let it idle up to 180°, then gave it a quick pump and rpms cut down nicely. Didn't stall in gear. According to my tack its about 800 rpm in park, 650 in drive.

Then the excitement kicked in. There are a number of 4-way stops in my neighborhood and at the first one I left some black marks! Awesome.
On the way back to the house from a roll with no break it broke loose again!

I'm pretty damn happy if ya cant tell!

Wednesday, November 16, 2011

Front end Panel Alignment

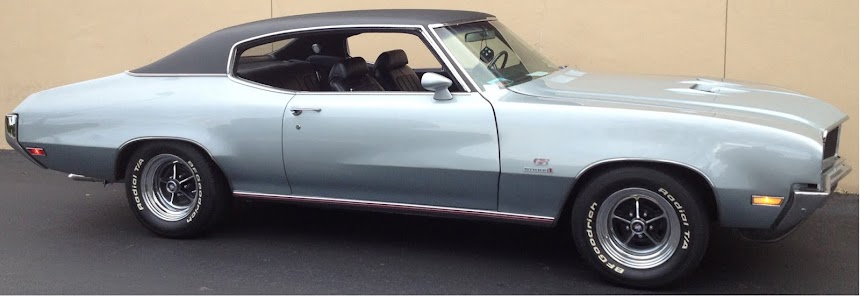
The Dr came over tonight, and we attacked my panel alignment issues.
With the bolts out of the core support I could not move the core support left or right.
So we took off the bumper, I had it loosened anyway. Easily done.
once off, bingo, we could slide the core support... but not quite enough.
Had to elongate the holes for the mounts a little, but everything is square now.
There's nothing obvious, but the car must have had a smack at some point to be off that much....

Although, I never thought about it before now, it was off the chassis, I wonder is the body on straight!? Oh well, it all looks pretty now.
Before we started, the passenger fender was a good 1/2" longer than the hood, but OK on the drivers side.
After we moved the core support, we loosened the hood to hinge bolts, and squared up all the gaps
We put the grill back on and it fit nicely.
Put the bumper back on and had to elongate the holes for that too but its nice an even on both sides now.

The best part now is that I have no more fender rubbing with the 'steam roller' tires!
Previously I had 1/8" space while turning on the passenger side and rubbing on the drivers side.
I put 9/16" worth of washers under the core support to bring it up for alignment.
Now Ive got 1/2" clearance for the tires while turning.. Bonus!


I also took off the rocker moldings as the 'strip' that it hooks on to from the rocker to the fender is missing. I got some repro pieces so I'll get them on, then the rocker moldings should fit nicer too.

New carb (3rd time's a charm) should be here this week
I have the choke setup mocked up on my bench with the old carb and it works beautifully when heated with the heat gun.

Sunday, November 6, 2011

The spoiler is on!


I had some instructions from a service manual but I threw them away real quick. Nothing lined up like in the exploded diagram

This spoiler had no holes in it so I had to drill my own anyway.

I love it though!


Thursday, November 3, 2011

Vacuum leak.. or something?

Well, after the rebuilt carb, the car drives like a scald cat!
But... it wont idle

The offenhauser intake, is a square bore design, where the quadrajet carb is a spread bore design therefore there is an adapter/spacer to allow the two to bolt up.

Couple problems here.
1 - I think a vacuum leak is causing my idle problems and this adapter/spacer is one possible source I need to eliminate.
2 - The dual snorkel air cleaner specific to the GS cars will not fit because of this spacer as the carb sits about 1" higher. My goal is to put this air cleaner back on so a new intake that matches the carbs spread bore design will put the carb back in a factory position and allow the air cleaner to fit.

So the engine came apart.


Intake removed, and some fresh Buick Red paint. I have also painted the AC and power steering brackets and the pulleys with some fresh satin black.


The new intake is an Edelbrock Performer, designed to keep the carb in the factory location so the GS air cleaner can be used. Its been blasted, and painted with high heat aluminum paint. All the fittings have been cleaned and its ready to install.


I even cleaned up the brake booster with some gold paint and the master cylinder with some cast iron paint


Here's where I am right now. The intake, carb and aluminum valve covers are just laid in place for now. Hope to have everything back together by this weekend.